
The Problem: Laying out a logo grid
This should be easy, right? Just plop your logos in the arrangement you want, and tidy them up with the Align tools. The problem is that not all logos are the same aspect ratio: some are really short and wide, while others (more rarely) are taller than their width, so if you use Align / Distribute for this, the short wide ones will look nearer to each other than the tall skinny ones. There’s also the inevitable request from a client to shuffle logos around once they’ve been laid out, which – if you’ve spent time manually working out the exact gap you want between each logo and its neighbour – RUINS EVERYTHING. But all those problems can go away if you use some expressions.
Rationale, or: how does this work?
We want to end up with the same (easily-adjustable) horizontal gap between each logo and the one next to it. We also want this to be preserved if we decide to scale any of the logos up or down. Further to that, we need to be able to have an arbitrary number of logos on an arbitrary number of rows: this approach will work with two logos on one line, or 8 rows each with 20 logos in, if you want it to. As a bonus, we’re going to put in an expression on each logo’s Scale property which sizes it to a predetermined amount, so all the logos look the same size when they’re side by side.
Tutorial video: Laying the logo grid out
The Code: Position property
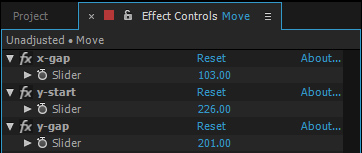
As well as the logos, you’ll need three other layers: a Null layer called “Move” with three slider controls on it called x-gap, y-start and y-gap (see pic below), and two adjustment layers, one called __START__ and one called __END__, between which you put the logos you want to lay out.
 Alt-click (Windows) or Cmd-click (Mac) on the keyframe stopwatch next to Position to paste this in.
si = thisComp.layer("__START__").index; // first layer number to look at
ei = thisComp.layer("__END__").index; // end layer
tr = Math.round(effect("row")("Slider"),0); // the row this one is in
ww = tw = 0; // width taken up by layers on this row
cw = thisComp.width;
n = wn = 0; // number of layers on this row
x = 0;
gx = thisComp.layer("Move").effect("x-gap")("Slider");
for (i = si+1; i < ei; i++) {
  // iterate through all the layers between start and end
  L = thisComp.layer(i);
  sc = L.scale.valueAtTime(L.outPoint)[0];

  if (Math.round(L.effect("row")("Slider").value, 0) ==  tr) {
    // a layer on the same row as the current layer. If it's before this one,
    // add its width to the ww variable
    if (i < index) {
      // it's on this row, AND before the current layer. So:
      ww += L.width * sc / 100; // actual pixel width after scaling
      wn++;
    }
  // the tw variable is the total width of all the layers on this row
  tw += L.width * sc / 100;
  n++;
  }
}
// we now know the number of layers on this row (n) and their total width (tw)
//   as well as the width of layers before this one (ww) and how many there are (wn)
//   number of x-gaps is one less than the number of layers
gn = n - 1;
// width of everything - layers plus gaps:
ttw = tw + (gn * gx);
// thus, the border either side...
bx = (cw - ttw) / 2;
// then the x-position of this layer is bx PLUS ww PLUS wn*gx PLUS half
//   this layer's width.
sc = thisLayer.scale.valueAtTime(thisLayer.outPoint)[0];
x = bx + ww + wn*gx + (thisLayer.width * sc / 100)/2;
// Now we get the y-pos a lot more simply, by adding y-start to the number of y-gaps
ys = thisComp.layer("Move").effect("y-start")("Slider");
yg = thisComp.layer("Move").effect("y-gap")("Slider");
y = ys + (tr-1)*yg;
[x, y]
This expression needs to go in the Position property for each layer you want to include in the grid.
Tutorial video: Scaling the layers to the same size, visually
The Code: Scale property
Building on that, we can add two extra slider controls to the Move layer, like this:
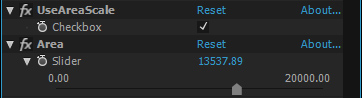
The first one is a simple checkbox which lets us switch between the two different methods of resizing that we’re using: either sizing each logo so it fits in the bounding box of the Move layer, or making them all the same area (given by the Area slider). If you’re using the bounding box method, I find it’s useful to move the anchor point to the middle of the Null layer (50, 50).
Update: rather than using a separate slider to control areas, it probably makes just as much sense (and is more intuitive) to use the area of the control null as well. So Line 8 has changed to reflect this.
L = thisComp.layer("Move");
sc = L.scale;
w = width * scale[0] / 100;
h = height * scale[1] / 100;

if (L.effect("UseAreaScale")("Checkbox") == true) {
  // we're using an area calculation to scale the logos
//  A = L.effect("Area")("Slider"); // target area
// NOW USING NULL'S AREA
  A = (L.width * sc[0] / 100) * (L.height * sc[1] / 100);
  s = 100 * Math.sqrt(A / (width * height));
} else {
  // we're using the bounding box of the Move layer itself
  // now get the ratio w:h
  r1 = w/h;
  r2 = sc[0]/sc[1]; // target ratio
  if (r1/r2 > 1) {
    // this layer is proportionally wider than the target layer; fit to its width
    s = (sc[0] / width) * 100;
  } else {
    // it's proportionally squarer than the target, so fit to its height
    s = (sc[1] / height) * 100;
  }
}
[s, s] * effect("sc")("Slider");
I’m indebted to Dan Ebberts, whose Motionscript site is a brilliant resource for learning pretty much anything you need to know about After Effects expressions.